|

VirtualAcorn Technical support:
Running VirtualAcorn Products on Windows 7
Before installing any version of VirtualRPC on Windows 7 please read the whole of this article.
Which type of CD do you have?
In 2014 we made a number of changes to VirtualRPC, these changes are to improve compatibility with future versions of Windows.
The 'New' updated versions of VirtualRPC are supplied on CDs with a white background. Earlier versions of VirtualRPC are supplied on
CDs with a silver background.
The image below shows the general design and layout of an old and a new CD. Please note that different products will have
slightly different names and graphics, it's the overall design and layout that you should compare, not the individual elements:
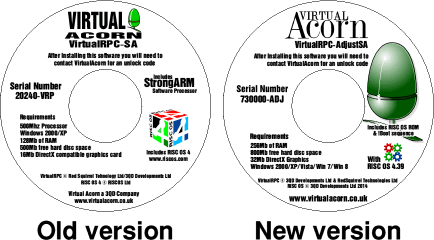
'New' CDs (2014 onwards)
If you have one of the new CDs there are no changes that need to be made to Windows before installing and running VirtualRPC.
'Old' CDs (2001 to early 2014)
The copy of VirtualRPC on the earlier CDs will still run on Windows 7 but you will need to make the following change before using VirtualRPC.
Windows User Account Control (UAC)
User Account Control (UAC) was introduced in Windows Vista. Under Vista User Account Control could only be turned on or off, under Windows 7 this has changed. Before you install a copy of VirtualRPC on Windows 7 you will need to change to Windows 7 User Account Control setting to Never Notify.
To open the 'User Account Control' settings window:
- Open the Control Panel in the normal way.
- At the top right of the Control Panel window is a 'Search Control Panel' box
- Click in the 'Search' box and type 'User Account Control'
- As you type Windows will return various suggested results. The more letters you type the more accurate the result.
- Once you have typed 'User Account Control' you will be left with one (1) result - 'Change User Account Control settings'.
- Click on 'Change User Account Control settings'
- The User Account Control slider window will now open.
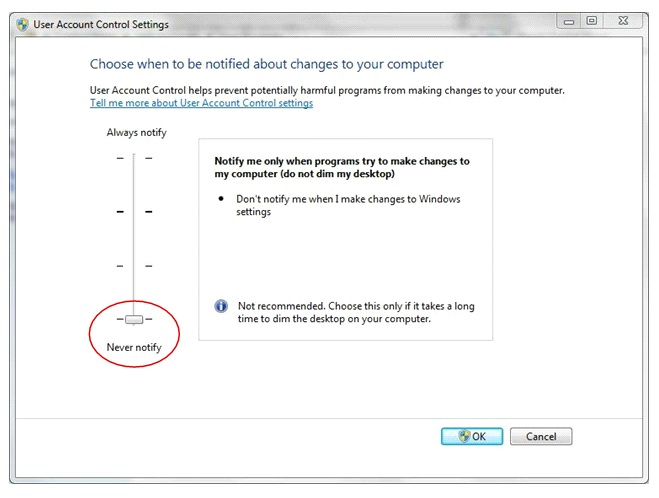
If the slider is already at the bottom position (Never Notify) then you can close the 'User Account Control' window and ignore the rest of this article.
If the slider is not at the bottom position you need to drag the slider to the bottom and then click on the OK button. You should then be prompted to Restart your Computer. If you are not prompted to restart your computer then you must perform a manual restart. The changes made to 'User Account Control' are not applied until Windows is restarted.
This restart is essential and must be performed before trying to install VirtualRPC.
Having restarted your computer you can now unlock your VirtualAcorn installation in the normal way. You must leave 'User Account Control' at the 'Never Notify' setting and must not alter it again unless you are not going to run any further VirtualAcorn products on this machine.
|